Tuesday, June 2, 2009

Make your Space to be a two-column Space

I hope all of you are in a good health.

Some blogs have had a two-column space but some haven't had yet. You can divide your space to be a two-column space. Making this kind of column is not difficult at all for you just need to put the script in your page element. If you have a 350-width sidebar, you had better divide it into two columns to put some ads or information in your page element.

I am going to give the code, so simple code. You can put the code below to your page elements;
<table border="0" id="ads" width="100%" cellpadding="5" cellspacing="5">
<td valign="top" height="50" align="left">

Your TEXT or LINK

<td valign="top" height="50" align="left">

Your TEXT or LINK

</div></td></td></table>
You can manage the height in red line. Add anything you want on the green line above. Hope this can be helpful, thanks in advance.

Sunday, May 17, 2009

Show Your Posts in Side Bar or Page Element

It's glad to share this script again. Some of you have probably applied this kind of tool in your blog. However, I need to share this to all of you.

I wants to give this script for free because it is also got for free from the other source, hehe. In this case, you can show your posts in your side bar by using or put this script in your page element. You can show till 25 posts to show the readers your other posts that may be those can't be shown in one page.

Well, here is the script that you can copy and paste to your Page Element. Just follow the instructions below;
  1. Login to your Blogger
  2. Click Layout
  3. Add a New Gadget (You can put the script wherever you want)
  4. Copy and Paste the script below;
  5. <div style="border: 0px solid rgb(153, 153, 153);
    overflow: auto;
    width: 300px;
    height: 200px;
    text-align: left; ">
    <script src="http://smkserian2008.googlepages.com/recent-post.js"></script>
    <script>var numposts = 25; var showpostdate = false; var showpostsummary = false; var numchars = 100; </script>
    <script src="http://tips-ofblog.blogspot.com/feeds/posts/default?orderby=published&alt=json-in-script&callback=rp">
    </script>
    <div class="clear"></div></div>
  6. Then Click SAVE
Manage the height and width (In GREEN Line) and make it suitable to your template design. Keep in mind to change the RED Line with your blog URL and you can also show the sum of your posts to be shown (Look at Blue Line)

Hope to hear from you that this is helpful and useful for all of you. In advance, thanks
Cheers !

Friday, May 8, 2009

Your Free Debit Card, Register Yours

I have a friend who has had this kind of card, Free Debit Card and I do like to have it. I asked him how he got the card and he showed me the way to get it. I think I have to share this for all of you since it doesn't need money at all to have it.

You must ever hear even look at the Card Sample below;


This is absolutely free. The question is 'what is really the use of this Debit Card?' Well, take a look of the Payoneer FAQ below;

Payoneer markets, manages and services prepaid MasterCard® cards. Payoneer works together with MetaBank to issue and process our cards. A leader in offering prepaid solutions for online applications, Payoneer has offices in New York and Tel Aviv

The Payoneer Prepaid MasterCard works just like any other Prepaid MasterCard card. The card is accepted at all locations worldwide, where debit MasterCard is accepted electronically. You can use it at a point of sale location to make purchases and at an ATM* to withdraw cash. With the added security of choosing your own PIN, you can be assured of no unauthorized use of your card.

To get this Free Debit Card, I will share the step to get it and Follow the instructions Below;

STEP I
  1. You have to register to FriendFinder to have an account. Click FriendFinder Registration to create a new account.
  2. Click JOIN NOW that you can find at FriendFinder Website
  3. Fill Your Complete Data (Follow the instructions given at the Website)


  4. After filling your data, you will be asked for filling the next page. You can fill it according to the instructions given. After filling your complete information on page 2, click the button to finish your registration.
STEP II

Now, you have passed the step I to be a member of FriendFinder. After passing the step I, follow the instructions below to be a member of FriendFinder Affiliation;
  1. Create your account at FriendFinder Affiliation
  2. Click Affiliate Signup
  3. It's recommended to fill your VALID data
  4. Preferred Program : Just Choose Number 1
  5. First Name : Your First Name
  6. Last Name : Your Last Name
  7. URL : Enter your URL or Blog
  8. Desired Password : Fill your Password
  9. Preferred Newsletter Language: English
  10. Email Address : Enter your Valid Mail Address
  11. Secondary Email Address : Just optional, you can also enter your another mail
  12. Checks Payable To : Fill your REAL Name
  13. Street Address : Your Address where you live
  14. City : The City where you live
  15. State/Province : Your State
  16. Country : Your Country
  17. ZIP/Postal Code : Your Postal Code
  18. What is your business tax classification? : Just leave it blank if you are not U.S Citizen
  19. Tax ID or Social Security Number: Leave it blank if you are not U.S Citizen
  20. Phone Number : Your Real Phone Number with International Format like 628123456 7899 instead of 081234567899
  21. Which Instant Messenger do you use? Choose your IM
  22. Use ePassporte : Choose No
  23. Please give us your comments: Leave your comments, anything, it's up to you
  24. After that, Click "Here for the Last Step"
  25. Make a check List to the agreement of FriendFinder
  26. Click SUBMIT
Now, You have had an affiliation account in FriendFinder Website and you can earn money by promoting your referral URL.

STEP III

To register in Payoneer and get the FREE Debit Card, follow the instructions below;
  1. Now you can login to your Affiliation Account.
  2. Go to your Accont Information at the top right of your page.
  3. Update your Account Information by clicking for the sign "Here is your account information. Click here to update your information."
  4. Click the "Signup to be paid by..." and you will be directed to the Payoneer Debit Card Registration. Click the Blue Button to register like the button below;


  5. Follow the instructions by filling your Real Name and Information
  6. Keep in mind that you have to fill your real Address due to your card will be sent to the address you fill.
  7. Finish and Submit your Registration
  8. Wait for 3 weeks for delivery of your Debit Card
Thanks for your patience. Wish you Good Luck !

Thursday, April 30, 2009

10 Free Ways To Increase Blog Traffic

1. Signup at Stumbleupon.com and make friends in your niche. You can then stumble your post and get your friends to also.

2. Go to Socialposter.com and fill in the exact url to your blog post then title,general summary text then your tags. Now submit to as many social sites as you can. If this is your first time to use these sites then you will need to signup.

3. Signup at technorati.com and add your blog then ping it when you update.

4. Get a free account at mybloglog.com and add your blog then join the communities and make friends. There is even a cool widget you can add to your blog like what you see on the right here.

5. Leave comments on blogs in your related niche. Here is a great free tool to monitor popular blogs in your niche so you can be notified and make one of the first good quality comments. Check it out at Commentsniper.com

6. Join Squidoo.com and make a lens then add a link to your blog.

7. Submit your blog to as many blog and rss directories as you can. Here is a good place to start http://www.masternewmedia.org/rss/top55/

8. Make sure and add your blog url to your forum signature on any forums you are a member. This can be a powerful way to attract visitors especially if you have quality forum posts.

9. Find one of the top bloggers in your niche then write a good review post of them. Let them know and they will probably link back to you.

10. Have an easy way for your readers to sign up for your RSS feed./eyeearnblog

Wednesday, April 29, 2009

Blogtimize - Optimize the ads on your blog

When working with a blog, you're facing some interesting ad implementation challenges: a predetermined page format, highly targeted content, and regular visitors, among other things. To make the most of your readership and content, here are a few suggestions:
Blend ads into your blog

To increase the likelihood that your readers will see and click on your ads, blend your ad units into the background of your blog. Choose a bold color for the ad title to help draw attention to your ads, then make sure that the background and borders of your ads are the same color as the background of the area where the ad is placed.


Experiment with multiple ad formats and locations

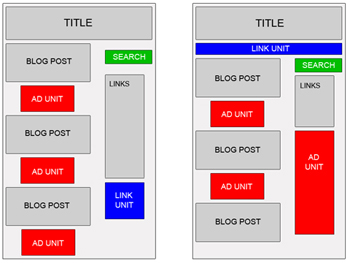
In general, wider ad formats tend to be more reader-friendly. Placing an ad unit after the first post will likely catch your readers' attention. Take a look at our sample implementations to get some ideas. Also, consider placing a Skyscraper (120x600) or vertical link unit on the right side of your blog. If you're using Blogger, you can find instructions on placing AdSense code in your blog's sidebar.

Offer readers more options with search and referrals

To make sure you're earning the most revenue possible with AdSense, go beyond just ads to use AdSense for search and referrals. You can increase your earnings, provide readers with valuable information, and take advantage of flexible formats.

Improve ad targeting

With section targeting, you can target an ad unit to a specific section of your blog, as well as block out irrelevant sections like navigational links. We recommend that only those familiar with HTML attempt to implement section targeting.

Tip for generating more traffic to your blog: If you're a Blogger user, activate this setting to notify Weblogs.com, a blog update notification service, whenever you have updated your blog. That means your blog will be included in various "recently updated" lists on the web as well as other blog-related services./Google

Tuesday, December 16, 2008

15 Great Google AdSense tips to earn money

Google AdSense Tip #1: Find your keywords
Before serving ads on a web page, check its keyword density. A free and advanced tool for finding the most prominent keywords in a page can be found here: SEO Density Analyzer. Copy the most important keywords to a text file ([web page name]-Google AdSense-keywords.txt).

Google AdSense Tip #2: Improve your keywords
Get keyword suggestions from Overture Search Inventory and from Google AdWords Sandbox. Get new keywords that can help you improve your ad relevance. Enter the keywords from [web page name]-Google AdSense-keywords.txt and save the suggestions to [web page name]-Google AdSense-suggestions.txt.

Google AdSense Tip #3: Keep your website focused on a theme
Use the keyword suggestions to enhance your web pages and to build theme-based content. And also try to get your keywords into the anchor text of your incoming links as much as possible. Don't forget that Google Google AdSense is keyword-targeted advertising: Google Google AdSense bases its advert topics on your websites content, this means that content-rich websites of a popular topic should attract a large amount of ads.

Google AdSense Tip #4: Write a new page every day
One of the best tips is to add a new page to your web site every day. The more content you have, the more visitors you will get. Put an Google AdSense unit on each and every content page of your site. But where? You will find more about that from the next Google AdSense tips.

Google AdSense Tip #5: Choose the right Google AdSense format
Wider formats are successful because the ads are compact, easy to read and are complementary to the content. The top three Google AdSense formats are:

336x280 large rectangle

300x250 medium rectangle

160x600 wide skyscraper


Another successful format is the 468x15 horizontal ad links, that can be placed under your navigation bar.

Google AdSense Tip #6: Color tips
When creating your Google Google AdSense ads it is recommended to use the color scheme and style of your website so that the ads blend in well. Ads without background color and borders perfom better than ads within borders with background color.

Create a custom Google AdSense palette:

border color = background color of your web site

background color = background color of your web site

link color = blue, color of your links

url color = black, #999999

text color = black, #333333, color of your main content

You can also rotate your color palette: select multiple color palettes that blend with your site to create variety.

Google AdSense Tip #7: Position tips
Visitors tend to look at the big headlines to see if your page is worth reading. If you get them interested, they will read the text and look for your navigation links.

Place the Google AdSense ads in a prominent place around the top/left part of your page or under your headlines, where your visitors are most likely to look at.

If you have an article page with a long body of text, the bottom of that article is a good place for Google AdSense ads because your visitors read the text and then they want more resources.

Google AdSense Tip #8: Increase the number of ads
If you have a lot of text on a page, use multiple Google AdSense units. You can use up to three Google AdSense units on a page, two Google AdSense search boxes and one unit of ad links.

Link units allow the user to refine what they're interested in. So if they may not be interested in specific ads on your page, they might be interested in a particular topic, and by clicking on a link unit and a link in the link unit, they'll be able to specify that they're interested in that specific topic and get a lot more options and variety on the ads that might appear.

Google AdSense for Search allows visitors to search Google.com or your sites (up to 3 domains). You earn money whenever they click on the ads that come up on the search results. If you click the Open search results in a new browser window checkbox in the Google AdSense for Search settings, you won't lose your visitors.

Google AdSense Tip #9: Preview Google ads
You can find out what ads will be served by Google Google AdSense if you install Google.

Google AdSense Preview Tool, a very simple tool available only for Internet Explorer 6.0. Click to advertiser sites without generating invalid clicks, and easily add their URLs to your URL filter list. Because Google AdSense uses geo-targeting, Google serves different ads for other countries. Instead of faking your IP or travelling abroad to test your ads, use this Google AdSense tool to see what ads see your visitors from France, Germany or other countries.

It's possible there are no Google Google AdSense adverts available for your webpage. Hide Public Service Ads, using alternate colors or images. Make sure you include the image in a simple html file as a link (use target="_top"). The image size should be the same as the dimension of Google AdSense units. In the alternate url box, enter the absolute url of the html file.

Read more about alternate ads.

Google AdSense Tip #10: What not to do
Don't click your own ads

Don't ask others to click on your Google ads

Don't manually change Google AdSense code

Don't place Google ads on sites that include prohibited content (e.g.: adult sites)

Don't employ cloaking, hidden text or farm links

Don't use Google AdSense ads on the same page with similar ads (e.g.: Yahoo Publisher Network)

Google AdSense Tip #11: Show images above or next to your ads
Placing images above Google AdSense ads is not necessarily prohibited by program policies. However, depending on the method of implementation this could be considered encouraging users to click on ads. So you should include a border line between the ads and the images. Don't show specific products in your images, in order not to mislead the visitors. Just use generic images that will increase the visibility of your ads.

Google AdSense Tip #12: Use section targeting
Use section targeting to emphasize some content in your page. On your site, place this code where you want to emphasize.

Content you want to emphasize.

If you want some content to be ignored, use

Google AdSense Tip #13: Alternate the colors of your ads
Google AdSense allows you to have up to 4 color variations for each variable for which you can specify color. You should do that if you put Google AdSense ads on pages that receive many impressions from the same visitors (for example forums) to reduce ad blindness. For example:

google_color_border = ["628098","628098","000000","000000"];

google_color_link = ["000000","BBB90C","BBB90C","628098"];

google_color_url = ["000000","628098","000000","000000"];

google_color_text = ["628098","628098","000000","000000"];

Great for overcoming ad blindness.

Google AdSense Tip #14: Your Google ads should be visible
Make sure your text ads are visible to the surfers in all screen formats. If you put the ads in a table give sufficient breathing room, i.e. proper cell padding and cell spacing to make the ads stand out from the rest of your content.

Google AdSense Tip #15: Use Google AdSense channels
You can categorize the content of your website into channels and then track your performance. This way you can experiment with different types of ads and see which is performing the best. Instead of buying an Google AdSense tracker, you can enter the most important pages in your site and see how they are doing. Create up to 200 channels for Google AdSense.

William Mok is one of the internet marketing company CEO and he is a successful internet marketer.To receive more internet marketing tips and free e-book , please visit./www.marketonair.com

Saturday, November 29, 2008

Blog Template 2-Colomn

This free Blogger template webdesign is based on the Blogger page color theme. It can be either a 2- or 5-column template. If you want a 2-column template, simply don't fill in the lowerbar widgets and make its colors blend with the post column.

The left sidebar is 230 px wide, perfect for the large square Adsense box.

Features:

  • The "Read more..." function is available to shorten posts.
  • Almost all colors and fonts are easy to customize.
  • Blog Posts Edit buttons are fully functional.
  • Flexible number of sidebars.
  • Menubar below the header for easy navigation.
  • Header image can be easily changed.
  • Tested ok in all browsers using Browsershots.org.

Important: Change your template without loosing any sidebar widgets.

Header ImageTo put the header image in your blog, click on the image below to open up a larger size and save it into your computer. Then, upload the image using the Layout > Page Elements > Header Edit tab. If you want to use your own image for the header, the image width has to be 900 pixels (with any height).


Header image adapted from Wallpaperpimper (credit accordingly if use).

Source: OurBlogTemplates , Download This Free Template Below:


Thursday, November 27, 2008

Blogger Template "Neuronic"


This is a multiple-column template: 3 sidebar columns on the right, 3 columns below the post, and 3 additional leaderboard-size columns to place ad banners! The template image above is captured from a 1024 pixels wide screen.

Header Image
The header image doesn't come with the template file. To put the header image in your blog, left-click on the image below and save the actual size into your computer. Then, upload the image into the Header Page Element in the Layout section of your blog.


Ads
This template was customized so that you can put ads in a lot of places. In addition to the usual sidebar, header, and main columns, you can place long leaderboard-size ads above and below the blog and above the footer. Check out these ads locations in this test blog.


"Mountain" Template


Template name: Mountain 273
Size: 38KB
Type: New Blogger Template (XML)
2 Column, Fixed Width, Editable
Best quality (IE & Firefox) all Size and Resolutions
Source : http://www.finalsense.com/

Copy Paste the code by clicking HERE

"Sunflower" Template


Template name: Sunflower
Size: 47KB
Type: New Blogger Template (XML)
2 Column, Fixed Width, Editable
Best quality (IE & Firefox) all Size and Resolutions
Source : http://www.finalsense.com/

Copy Paste the code by clicking HERE

"Sponge Bob" Template


Template name: Sponge Bob
Size: 69KB
Type: New Blogger Template (XML)
2 Column, Fixed Width, Editable
Best quality (IE & Firefox) all Size and Resolutions
Source : http://www.finalsense.com/

Copy Paste the code by clicking HERE

"A Coyote Chase" Template


Template name: A Coyote Chase
Size: 49KB
Type: New Blogger Template (XML)
2 Column, Fixed Width, Editable
Best quality (IE & Firefox) all Size and Resolutions
Source : http://www.finalsense.com/

Copy Paste the code by clicking HERE

"Girl 3-Column" Template


Template name: Girl 3-Column
Size: 40KB
Type: New Blogger Template (XML)
3 Column, Fixed Width, Editable
Best quality (IE & Firefox) all Size and Resolutions
Source : http://www.finalsense.com/

Copy Paste the code by clicking HERE

"New Cafe Blog" Template


Template Name: New Cafe Blog
Size: 43KB
Type: New Blogger Template (XML)
3 Column, Fixed Width, Editable
Best quality (IE & Firefox) all Size and Resolutions
Source : http://www.finalsense.com/

Copy Paste the code by clicking HERE

"Trading" Template

Template Name: Trading
Size: 38KB
Type: New Blogger Template (XML)
(with Google account )
Best quality (IE & Firefox) all Size and Resolutions
Source : http://www.finalsense.com/

Copy Paste the code by clicking HERE

Wednesday, November 26, 2008

"Sun Set" Template

This free Blogger template can be either a 3- or 6-column template. If you want a 3-column template, simply don't fill in the lowerbar widgets and make its colors blend with the post column.


Features
  • The "Read more..." function is available to shorten posts.
  • Almost all colors and fonts are easy to customize.
  • Blog Posts Edit buttons are fully functional.
  • Flexible number of sidebars.
  • Menubar below the header for easy navigation.
  • Header image can be easily changed.
  • Tested ok in all browsers using Browsershots.org.


Header Image
To put the header image in your blog, left-click on the image below and save the actual size into your computer. Then, upload the image using the Layout > Page Elements > Header Edit tab. If you want to use your own image for the header, the image width has to be 950 pixels (with any height). /OurBlogTemplates


Tuesday, November 25, 2008

"Joy" Template

This free Blogger template can be either a 3- or 6-column template. If you want a 3-column template, simply don't fill in the lowerbar widgets and make its colors blend with the post column.

The right sidebar is 336 pixels wide, great for the placement of a large Adsense square box, or if you want to put large pictures like in the test blog below.


Features:
  • The "Read more..." function is available to shorten posts.
  • Almost all colors and fonts are easy to customize.
  • Blog Posts Edit buttons are fully functional.
  • Flexible number of sidebars.
  • Menubar below the header for easy navigation.
  • Header image can be easily changed.
  • Tested ok in all browsers using Browsershots.org.


Header Image
To put the header image in your blog, left-click on the image below and save the actual size into your computer. Then, upload the image using the Layout > Page Elements > Header Edit tab. If you want to use your own image for the header, the image width has to be 930 pixels (with any height).


WP-Polaroid Blogger Template

I’m very pleased to announce the release of WP-Polaroid for Blogger! This template is full of cool features and took me a long time to convert from the original WordPress theme (by Adii) so I hope you appreciate it. :-)

This template is very popular with WordPress users and for good reason. It’s stylish, nicely laid out, and very web 2.0. Not only that, it’s also got the following sidebar page elements built in. You just need to configure them (follow the directions below) in order for them to work properly.


  • Flickr photo slideshow area where you can display your personal or random pictures
  • Mybloglog recent blog readers section (you’ll need a mybloglog account)
  • Three 125×125 ad spots to help you make money from your blog
  • Recent posts list
  • Recent comments list
  • Two sidebar link lists
  • Page navigation links in the header
  • RSS feeds for your posts and comments
  • A header spot to display your personal photo

Make sure to read through all the steps below in order for the template to function on your blog properly. I tried to make it as simple for you as possible by using the Page Elements instead of embedded code but if you have any questions, please post them below. I usually get back to everyone within 24 hours so please be patient!

Also, please be aware that in order to correctly setup this template you’ll need to be comfortable with editing the template code as well as some experience with photo editing software (see step #9). I’d hate for you to spend a bunch of time trying to get this template working only to hit a road block towards the end.

WP-Polaroid Blogger Installation

Now I’m going to be honest with you before we begin. When you use this template you’ll most likely have to wipe out all your existing page elements and start from scratch. Not only is this easiest but it also gives you a clean slate. Now this isn’t always the case but I just wanted to warn you upfront. You might even want to setup a new blog within Blogger to test this template out before you really start using it. It’s easy to do — just go to your Blogger dashboard (top right corner link) and “create new blog”. Think of it as a testing area before clobbering your existing blog. Another option is to try and backup your existing page elements which is explained in my “How to Install a Blogger XML Template” article.

Disclaimer: I am not responsible if you mess up your Blogger site. This template and set of instructions is free but does not come with any sort of warranty. I’m sure you already realize this but I just wanted to cover my butt regardless. (this is the fine print)

The following 10 steps assume you’ve installed the new WP-Polaroid Blogger template and are now ready to configure the page elements. If you had trouble installing the template, try applying it a second time and saving. Blogger is buggy and that’s actually what I had to do when setting up a demo blog for this writeup (Update - you might want to start with step #10 and then come back to step #1 since it involves editing the actual template code before setting up the page elements).

You can also download the original Photoshop .psd from Adii’s site if you’d like to modify the images. He also provides some steps on setting up the template but for WordPress only.

Open your blog site in a new browser window so you can see how it currently looks. I’ve put some placeholder text in some areas (which we’ll replace in the steps below) to give you an idea as to how it’s supposed to look. Now in a separate browser window, head on over to “Template” =>”Page Elements” and we’ll start setting up your new Blogger template.

Step #1 - Configure the Header Page Elements


First we’re going to customize the header and we’ll start with the Header-Text-Box-Left page element which you can see marked with a red square in the image.


header-text-box-left.gif


Now when you edit the page element you’ll see “Header-Text-Box-Left” as the title which you can change to something like “MORE ABOUT ME…”. Then add whatever text you want in the text box which will end up appearing below the title (like the white text in the image). Ok, save your page element and you’re done with this box. Do the same with the “Header-Text-Box-Right” page element and you’ll be finished with the header text boxes. Save and then refresh your other Blogger browser window to see what it looks like. We’ll take care of the header links and center puppy image later on since it requires editing of the template code. Let’s move on.

Step #2 - Setup Recent Posts and Recent Comments Page Elements

These lists aren’t going to show up when you first installed the template so we’re going to bring them to life now. They are actually both RSS Feed widgets so we’ll need to paste in your feed and comment rss feeds to make them work. Let’s start with the Recent Posts page element so click edit it. Then paste in your RSS feed url which will most likely be in this format http://YOURSITE.blogspot.com/feeds/posts/default . Make sure to replace “YOURSITE” with your actual blog url.


recent-posts-feed.gif


There’s no need to change the title (unless you want to call it something else) so then hit “Save Changes”. Then save your blogger layout and go over to your other browser window, refresh and see the Recent Posts appear in your blog’s sidebar. Pretty cool huh! Now you’re going to do the exact same thing with the “Recent Comments” page element but you’ll instead use this feed format http://YOURSITE.blogspot.com/feeds/comments/default . Again, make sure to replace “YOURSITE” with your actual blog url. Save and make sure it’s working properly. If it doesn’t appear on your blog, chances are you don’t have the correct feed url or you might not have any comments yet.

Step #3 - Setup My Sponsors and Link Love Page Elements

These two page elements are basically link lists where you can links to any sites. Did you know that you can actually sell links from your blog? It’s a very popular and growing business on the web since the number and quality of links to ones’ site increases their rankings in Google and Yahoo. If you want to learn more about selling links on your blog, check out Text Link Ads for more information. I use them and they do a 50/50 revenue split which is great since they handle the advertising & transactions.

Anyhow, to setup the link page elements, click on edit of the My Sponsors page element and then enter the names and urls of the sites you wish to link to. Feel free to add a link to my site so other’s know where you got this wonderful template!


my-sponsors.gif


Now do the same for the Link Love page element to get additional links added. If having both link page elements is too much, feel free to delete one from your page layout.

Step #4 - Configure the Blog Archive Page Element

This page element should have been working from the moment you installed this template. The only problem is it probably didn’t look right because the page element style needed to be set to “Flat List” so let’s do that now (if your blog archive list is already set to flat, then you can skip this step). Edit the page element and change the default of “Hierarchy” to “Flat List”. You’ll see it change in the preview window so you’ll know it worked.


blog-archive.gif


Click “Save Changes” and then save the page layout. Now view your blog which you have open in a separate browser window to see how it looks now. It should be correct.

Step #5 - Configure the Recent Readers Page Element

Now this is one of the unique and cool features about this template. It’s integrated with MyBlogLog which is a cool tool for showing pictures of visitors to your site. If you don’t already have an account, you need to set one up first before completing this step. Once you’ve setup an account, claimed your blog, then you can create a widget. I’m going to assume you’ve done those steps and are now ready to plug in your widget. You should be on this screen now within mybloglog.com.


mybloglog.gif


We’re going to make this very easy so don’t worry about any of the colors, width, etc and just click the “Preview and Get Code” button. I know this sounds strange but just stick with me here. So the next screen you’ll get a page with the blocks of code you can use. It will look like this:


mybloglog-code.gif


The only piece of that code that we need is the part I’ve marked in red. This is the mblID code which is the unique id just for your blog. you’re going to copy this entire id code (I covered some of the digits in the screenshot on purpose) which should be 16 numbers, and put it somewhere safe (like open notepad and paste it there for now).


<script type="text/javascript" src="http://pub.mybloglog.com/comm2.php?mblID=PUTYOURCODEHERE&c_width=425&c_sn_opt=n&c_rows=2&c_img_size=f&c_heading_text=Recent+Readers&c_color_heading_bg=FFFFFF&c_color_heading=ffffff&c_color_link_bg=FFFFFF&c_color_link=FFFFFF&c_color_bottom_bg=FFFFFF"></script>

Then take this javascript code above and replace the “PUTYOURCODEHERE” with the 16 digit number you just put somewhere safe. Next, you’re going to edit the “Recent Readers” page element and paste this new code into the text box. It will look like the image below but it won’t wrap (I just did it for illustration purposes).

recent-readers-js.gif


Click “Save Changes” and go preview it in your blog. This will replace the current set of mybloglog pictures you see on your site with your set of visitors. Now don’t get too excited because there’s a good chance this section will be empty for a while (almost for sure if you just signed up for a mybloglog account) since you haven’t had any visitors yet so don’t worry. Give it a few weeks before you’ll see some pictures appear.

Step #6 - Configure the Flickr Photo Page Element

This is another optional page element and you can go ahead and delete it if you want. The configuration requires you have a Flickr account and some experience picking out pictures to link to. The pictures that are already installed on this Blogger template are basically links directly into Flickr. There are more than one way to get this section working (like using rss instead of hard coded image links) but I’m only going to show you the simple way. First edit the “FlickrRSS” page element and make sure you’re in html edit mode. Then in the text box you’ll want to paste in the new image code you want to use (see below for the proper format). It will look something like this:


flickr.gif


Here’s the code I’m currently using to make the images work:

<p><a href='http://www.flickr.com/photos/alankin/2213697421/'><img src='http://farm3.static.flickr.com/2312/2213697421_6be21edcfa_s.jpg' alt='different paths' /></a></p><p><a href='http://www.flickr.com/photos/alankin/2213697413/'><img src='http://farm3.static.flickr.com/2399/2213697413_c30648a36a_s.jpg' alt='college campus lawn' /></a></p><p><a href='http://www.flickr.com/photos/alankin/2213697411/'><img src='http://farm3.static.flickr.com/2150/2213697411_96525d4022_s.jpg' alt='wires in front of sky' /></a></p><p><a href='http://www.flickr.com/photos/alankin/2213632473/'><img src='http://farm3.static.flickr.com/2215/2213632473_8cf8af1c7f_s.jpg' alt='aerial perspective' /></a></p><p><a href='http://www.flickr.com/photos/alankin/2213632465/'><img src='http://farm3.static.flickr.com/2043/2213632465_5ce3aa4813_s.jpg' alt='clouds' /></a></p><p><a href='http://www.flickr.com/photos/alankin/2213632461/'><img src='http://farm3.static.flickr.com/2392/2213632461_96a8be9c06_s.jpg' alt='clouds over the highway' /></a></p><p><a href='http://www.flickr.com/photos/alankin/2214395424/'><img src='http://farm3.static.flickr.com/2253/2214395424_b9f11a18c0_s.jpg' alt='The Poultney Inn' /></a></p><p><a href='http://www.flickr.com/photos/alankin/2214395422/'><img src='http://farm3.static.flickr.com/2133/2214395422_1aa98af39f_s.jpg' alt='apartment for rent' /></a></p>

So essentially you need to find pictures on Flickr or somewhere on the web that you want to link to. Using Flickr’s small image size makes sure that they will properly fit in this page element area. Make sure you use the code format above (<p> and </p> around each image) and use eight images. If not, it won’t look right on your blog. Again, the code snipet above is the exact code I’m using for the default images on your blog.

Hopefully this step makes sense and you’re able to add the images you want. If not, just remove the page element and move on.

Step #8 - Configure the Three 125×125 Ad Spots


I don’t know about most of you but I like to try and monetize my blogs. It’s a great passive income stream and fun to see how much you can make. Don’t expect a lot to pour in but at least get some ads on your site to make a few bucks. If you haven’t already read my “How to Make Money From Your Blog - Tip #1” article about setting up Google AdSense on your blog, I’d advice you to read it. You can create 125×125 ads within Google and place them in these spots, for example.


Now let’s go edit the page element. You need to have three 125×125 ads ready to pop into this spot otherwise it’s not going to work. The images also need to be hosted somewhere so make sure you’ve got everything ready before moving forward. Here’s an example of what your code will look like:


125×125-ad-spots.gif


This is the actual code currently being used in your blog template. It’s placeholder code but important to keep so continue reading to understand why.


<a href="http://www.linkworth.com/?a=10230"><img src="http://i254.photobucket.com/albums/hh92/eblogtemplates/adstheme/banner-linkworth2.gif" border="0px" /></a>

<a href="http://www.widgetbucks.com/home.page?referrer=10252004"><img src="http://images.widgetbucks.com/images/referral/125x125_A.gif" border="0px" /></a>

<a href="http://www.text-link-ads.com/?ref=2164"><img src="http://i254.photobucket.com/albums/hh92/eblogtemplates/ads/text_link_ads_F_125x125.gif" border="0px" class='last' /></a>


It’s very important you keep the formatting of this section intact otherwise they won’t appear properly. I’m mainly speaking about the class='last' tag at the end of the third 125×125 ad. If that isn’t included in your code, it will look funny on your site. This is a hard step so hopefully you got this far.


If you don’t have any ads to use yet, feel free to keep the placeholder ads there. I recommend clicking on the three ads and setting up accounts with them so you can make money with your blog. If you don’t want the ads you can just delete this page element from your page layout.


Step #9 - Change the Puppy Header Image


Yes, you’re probably wondering why there’s a picture of a cute puppy on your blog. The good news is I actually put it there as a placeholder so it’s easier for you swap out and add your own image. The bad news is you’ll need to have some photo editing skills in order to get the image setup correctly. So first let me tell you how to change the image and then second, explain how to add your own instead. The puppy image code is in the .css part which looks like this:


/*=== Change this header puppy picture to one of yours ===*/

#polaroids-pic{

background: url(http://i254.photobucket.com/albums/hh92/eblogtemplates/polaroid/puppy.png) no-repeat;


This is where you’ll need to put the link to your new image. If you don’t want an image at all (or at least for the time being) then just delete the url and the default black polaroid picture will appear. The puppy picture is just positioned on top of the default black picture.


header-pic-no-puppy.gif


So before you can add a new photo, you’ll need to properly size and rotate it. So open your picture in any photo editor like MS Paint, Adobe Photoshop, Paint.net (free download), GIMP (free download), or Picasa. If you don’t have software already installed, you can always use one of the free online photo editing sites instead like Picnik, Phixr, or FotoFlexer. Whichever photo editing software you decide to use, get ready to make the following two changes.


  • Resize the photo to 240×240

  • Rotate the photo 4 degrees counter clockwise


Update (2/1/08)


Due to popular demand, I’ve made the polaroid header image straight so it’s easy to add your personal photo without having to rotate it. It’s included in the latest version so just download and you’ve got it.


This sets up the photo to the right size to fit back on top of the polaroid background. Next, save the image you just modified (You can save the photo in any of the standard image formats like png, gif, jpeg, etc) and upload it to a place online where you can link to it.


There are free image hosting services like Photobucket, Googlepages, or ImageShack just to name a few. I personally use Photobucket but any of those will do. You’ll need to setup a free account and then you can upload your images. After you’ve uploaded your new image, you need to get the url where the image is now located. If you decided to use Photobucket, your new url will look something like this:


http://i254.photobucket.com/albums/hh92/yourname/newfolder/yourpicture.png


Take that url and replace the puppy.png url I showed you above. Save your template and reload your blog. Your new picture should now be on your home page! If not, then double-check and make sure you correctly uploaded the photo and it works. If you see your photo on your home page but it’s just not aligned properly, then you’ll need to go back to your photo editing program and tweak it some more. Another option is to edit the .css file and search for #polaroids-pic { . There you can the position, height, width, etc for fine tuning. You really shouldn’t need to mess with those settings though.


UPDATE: If you also want to remove the “Polaroid of Me” text across the default polaroid picture you can. You’ll need to edit the template code and replace the existing polaroid image on line 219 with this one. Search for “rotator.png” then replace it with “blank-polaroid.png” and you should be good to go. (Thanks to Lindsay in the comments below for the suggestion!). The latest download version now comes without the text on the polaroid picture.


Step #10 - Change the Navigation Header Links


This probably should have been step #1 but I honestly forgot about them until now. These links are hard coded into the template so you need to edit the actual code to make them work. Just edit the code template and search for the following bits of code:


<li><a href='/'>HOME</a></li>

<li><a href='#'>ABOUT ME</a></li>

<li><a href='#'>ANOTHER PAGE</a></li


You should keep the HOME link as is since it just points back to your home page. You’ll also want to change the links on the right side as well:


<li><a href='#'>ADVERTISE</a></li>

<li><a href='#'>CONTACT</a></li>

<li><a href='#'>SITEMAP</a></li>


Now just change the a href=”#” and tab name to something you want for each of the links. Do it for both sides and that’s it. Pretty easy actually. Just make sure to save it and say yes when it asks you to delete several page elements like HTML1, HTML2, etc. I don’t know why it asks you each time when you save your template. I think it’s a Blogger bug actually.


Well folks, after 2 hours of writing this up and 8+ hours of converting this template to Blogger, I’m officially done! I hope you enjoy the template and the instructions on configuring it. If it wasn’t for Adii (the original designer), this template never would have been available to convert into a Blogger template!


If you have any questions please post below using the comments box. Please be aware I am not a photo editing expert and questions should only relate to configuring this template. Blogger in general, has lots of bugs so any “bx-” type error messages you may get I won’t be able to help you. Sorry but it’s Blogger’s fault not mine or yours.


Revision History


Update (2/25/08) - A bug has been found and fixed as of today. It’s a small one but it was brought to my attention by Tessa and Rey. The “Next” and “Previous” posts links were missing from the bottom of the template. If you downloaded this template prior to today, you’ll either have to download it again or fix your existing template. The fix is pretty easy and as follows:


Search your template code for the tag <data:adEnd/>. There should actually be two of them. You want the second one. Below that code you want to paste:


<!-- navigation -->

<b:include name='nextprev'/>


<!-- feed links -->

<b:include name='feedLinks'/>


The final block of code should look like this:


add-new-code-polaroid.jpg


You’ll then want to style this new set of links which is also easy to do. Scroll back up to the top of your code and in the .css section you’ll want to add the following code:

#blog-pager-newer-link {float: left;}

#blog-pager-older-link {float: right;}

#blog-pager {padding:50px 15px 0px; text-align: center; }

This will make your new links aligned neatly instead of being squished to the left. You can style them even further (color, size, etc) but you’ll have to do that on your own.

Update 4/22/08 - Several people requested to have real 125 x 125 ads instead of the blank placeholder ones so this has been done. A new screen shot shows how this looks as well as the live demo. You can swap out the ads or keep them there indefinitely if you don’t have any ads to use.

Update 5/17/08 - Fixed the individual post image right align issue. You can easily fix this yourself if you’re using this template prior to 5/17. Search your template code for “.postmetadata” and then change the padding element of “15px” to “20px”. That will push everything down and align the images correctly. Thanks to Ricardo for his help on this.

Want to make your blog stand out from the crowd? I recommend giving your newly downloaded Blogger template a unique and personalized look. Read our Free Blogger Header Images article and find yourself a great custom header image!

If you like this post then please consider subscribing to our eBlog Templates RSS feed. You can also subscribe by email and have new templates and articles sent directly to your inbox.




Monday, November 24, 2008

Installing the template in your blog

Before you start changing your template, make sure you save your old template file just in case you need to start again. And make sure you have a programming-based text editor installed on your computer (to make the codes easier to see. If you don't have one, there are many free programming text editors that you can download. I use Notepad++).

These are some instructions on how to put the template in your blog. There are some ways to do it; I'll explain some of them, starting from the simplest methods.

METHODS TO INSTALL BLOGGER TEMPLATES:

Method I. Simplest method - Uploading the xml file:
  1. Download the template that you want and save it in your computer (make sure it is saved as xml file).
  2. Go to your Layout > Template > Edit HTML page.
  3. Choose the file from the Browse... button, and then press the Upload button.
  4. It may ask you to delete some widgets - so just delete them. (Widgets are the extra page element added to the sidebars).
  5. You're done! View your new blog.
  6. If your contents doesn't look aligned, that's probably because you don't have any widget on one of the sidebars - so add your widgets.

Method II. Copy-paste the template codes into the Blogger text editor:

If you don't want to download the file first, or prefer to paste the code into your Blogger editor, this is how to do it.

  1. Open the template file that you want and copy all the codes.
  2. Got to your Layout > Template > Edit HTML page.
  3. Click the Expand Widget Templates (EWT) button. (If the EWT button is on or clicked, all template codes will be visible; if it's off or unclicked, then some codes related to Blogger Data are hidden so that the HTML codes look less messy - most of the time, you don't want to change or add codes inside the Blogger Data area).
  4. Select all the codes in your Blogger editor and delete them all. Then paste the codes for your new template.
  5. It may ask you to delete some widgets - so just delete them. (Widgets are the extra page element added to the sidebars).
  6. You're done! View your new blog.
  7. If your contents doesn't look aligned, that's probably because you don't have any widget on one of the sidebars - so add your widgets.

Method III. Copy-paste the CSS styling only into the template code:

The annoying part about using the two methods above is that you have to delete some widgets that you've made (maybe some Adsense codes, Text contents, HTML codes - usually the widgets About Me, Labels, and Blog Archives are not deleted). If you don't want this to happen, you must copy and paste the CSS styling part only. By changing the CSS part only, you don't change anything related to the Blogger Data including the data about the widgets that you've made.

CSS styling is the code that controls everything about the template style or appearance - the font size, colors, background images, header size, post layout, sidebar size and locations, etc.

But to do this is a bit tricky. You have to make sure the basic layout of your old template with the new one is the same. For example, if the old template has 3 columns (2 sidebars and 1 main), your new template has to be 3 columns too. The arrangement of columns will follow the old template; for example SMS or MSS or SSM. If the old and new templates don't have the same content layout, it won't work! If you're not sure about this, just use the first 2 methods above.

If you still want to change the CSS styling part only, read on below.

In the template, look for the code section in between the b:skin tags. In my templates, I've labeled the start and end of the CSS styling part. (In the code, the 'Page structure tweaks' code are actually part of the CSS styling too, but just leave it there.)

So, these are what you need to do to change the CSS part only:

  1. Open the template file that you want and copy the CSS styling code only.
  2. Got to your Layout > Template > Edit HTML page.
  3. Don't click the Expand Widget Templates (EWT) button because you don't have to change the Blogger Data code.
  4. Select the existing CSS styling codes in your Blogger editor and delete them. Then paste the codes for your new template.
  5. It may ask you to delete some widgets - so just delete them. (Widgets are the extra page element added to the sidebars).
  6. You're done! View your new blog.
  7. If it doesn't work, you can always use the first 2 methods above and add the widgets later./OurBlogTemplates

Sunday, November 23, 2008

XML Blogger Template "Shiny"

This free Blogger template can be either a 3- or 6-column template. If you want a 3-column template, simply don't fill in the lowerbar widgets and make its colors blend with the post column.

The right sidebar is 300 pixels wide, great for the placement of a large Adsense square box, or if you want to put large pictures like in the test blog below.


Features
  • The "Read more..." function is available to shorten posts.
  • Almost all colors and fonts are easy to customize.
  • Blog Posts Edit buttons are fully functional.
  • Flexible number of sidebars.
  • Menubar below the header for easy navigation.
  • Header image can be easily changed.
  • Tested ok in all browsers using Browsershots.org.
Header Image
To put the header image in your blog, left-click on the image below and save the actual size into your computer. Then, upload the image using the Layout > Page Elements > Header Edit tab. If you want to use your own image for the header, the image width has to be 980 pixels (with any height).


◄ Posting Baru